Healthy Baked Oatmeal Cups for Kids: Chewy and Soft

- Time:10 minutes active + 30 minutes baking = Total 50 minutes
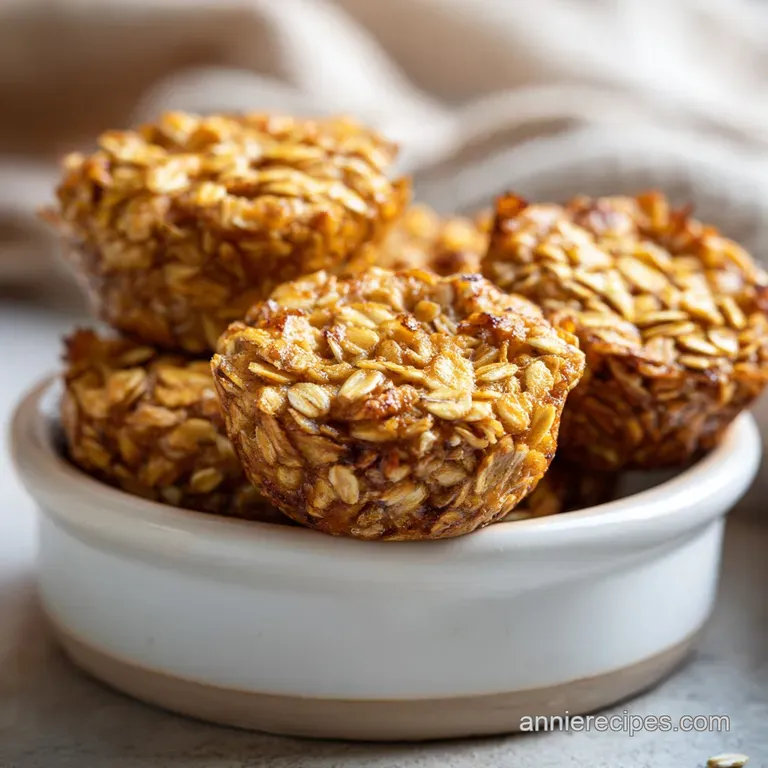
- Flavor/Texture Hook: Soft, chewy center with a light mahogany top
- Perfect for: Toddler breakfasts, school lunchboxes, and frantic Monday mornings
- Easy Healthy Baked Oatmeal Cups for Kids
- Secrets Behind The Texture
- Quick Specs For Busy Mornings
- The Essential Ingredient List
- Minimal Tools For Fast Prep
- Simple Steps For Success
- Solving Common Baking Issues
- Creative Swaps and Twists
- Storage And Reheating Guide
- Best Side Pairing Ideas
- Recipe FAQs
- 📝 Recipe Card
Easy Healthy Baked Oatmeal Cups for Kids
The smell of warm cinnamon and caramelized banana hitting the air is enough to wake up any sleepy kid. I remember the first time I tried to move my toddler away from sugary cereals. He had this weird phase where he refused anything "brown" if it looked like porridge.
It was a battle of wills every single morning, and honestly, I was losing.
Forget the idea that oatmeal has to be a mushy bowl of glue. I started experimenting with portable versions that looked like muffins but felt like a hearty breakfast. Once I realized that overripe bananas could do the heavy lifting for sweetness and structure, everything changed.
Now, these are the only things my kids will actually eat without a fight.
You can expect a snack that's easy to hold and doesn't create a mess. They have a velvety interior and a slight resistance when you bite into them, making them feel substantial. We're talking about a genuine kickstart to the day that doesn't leave them crashing by 10 AM.
Secrets Behind The Texture
Banana Binding: Mashed bananas act as a natural glue, holding the oats together so the cups don't crumble. This replaces the need for refined flour entirely.
Oat Hydration: The oats soak up the milk and egg during the 30 minutes in the oven, creating a dense, chewy crumb. It's a far cry from the watery consistency of stovetop oats.
Chia Gelation: When chia seeds hit the wet ingredients, they form a gel that adds structural integrity. This ensures the cups stay moist without becoming soggy.
Leavening Lift: A small amount of baking powder creates tiny air pockets. This stops the cups from feeling like heavy bricks and gives them a lighter feel.
| Servings | Ingredient Adjustments | Pan Size | Cook Time |
|---|---|---|---|
| 6 people | Half the recipe | 6 slot tin | 22-25 mins |
| 12 people | Full recipe | 12 slot tin | 25-30 mins |
| 24 people | Double the recipe | Two 12 slot tins | 25-30 mins |
Quick Specs For Busy Mornings
Right then, let's look at the nitty gritty. If you're trying to coordinate a school run while making breakfast, you need to know exactly how this fits into your timeline. The 10 minutes of prep is a breeze because there's no fancy equipment involved. You're basically just mashing and stirring.
The real magic happens during the 30 minutes of baking. I usually use this time to get the kids dressed or clear the dishwasher. Since these are baked in a muffin tin, they're naturally portioned.
No one fights over who got the bigger piece, and they fit perfectly into a small reusable container for the road.
Trust me on this, don't rush the cooling process. Giving them 10 minutes to sit in the pan is the difference between a sturdy cup and a crumbly mess. It's a fast process overall, but that short rest is non negotiable.
The Essential Ingredient List
For the Dry Base
We start with a solid foundation. The oats provide the bulk, while the cinnamon adds that comforting aroma.
- 2 cups (180g) rolled oats Why this? Provides a hearty, chewy texture that keeps kids full (Substitute: Quick oats for a softer, more uniform bite)
- 1 tsp (5g) baking powder Why this? Gives a slight lift so they aren't too dense (Substitute: 1/4 tsp baking soda + 1/2 tsp cream of tartar)
- 1 tsp (2g) ground cinnamon Why this? Natural warmth and sweetness (Substitute: Nutmeg or pumpkin spice)
- 1/4 tsp (1.5g) salt Why this? Balances the sweetness of the banana (Substitute: Sea salt)
For the Wet Bind
This is where the moisture and natural sugars come from. Using very spotty bananas is the real pro move here.
- 2 medium (225g) overripe bananas, mashed Why this? Natural sweetness and binding power (Substitute: 1/2 cup unsweetened applesauce - Note: results in a softer cup)
- 1/2 cup (120ml) milk Why this? Hydrates the oats for a velvety feel (Substitute: Almond or soy milk for dairy-free)
- 1 large (50g) egg Why this? Provides structure and protein (Substitute: Flax egg - 1 tbsp ground flax + 3 tbsp water)
- 2 tbsp (30ml) maple syrup Why this? Subtle, clean sweetness (Substitute: Honey or agave)
- 1 tsp (5ml) vanilla extract Why this? Rounds out the flavor profile (Substitute: Almond extract)
For the Optional Mix ins
These are the "bribes" that make kids actually want to eat their oats.
- 1/4 cup (35g) mini chocolate chips Why this? Small bursts of sweetness in every bite (Substitute: Dried cranberries or blueberries)
- 1 tbsp (16g) chia seeds Why this? Adds Omega-3s and helps the bind (Substitute: Ground flaxseeds)
| Ingredient | Science Role | Pro Secret |
|---|---|---|
| Overripe Bananas | Natural Binder | The blacker the peel, the sweeter the cup |
| Rolled Oats | Structural Bulk | Don't blend them unless you want a cake texture |
| Chia Seeds | Moisture Lock | Let the batter sit 5 mins to activate the gel |
| Baking Powder | Aeration | Sift it if you see clumps to avoid bitter spots |
Minimal Tools For Fast Prep
You don't need a kitchen full of gadgets for this. In fact, the fewer tools you use, the faster the cleanup. I've found that a simple hand mash method is way more efficient than pulling out a food processor. Just use a fork and a bit of elbow grease.
All you really need is a large mixing bowl, a medium bowl for the wet stuff, and a standard 12 slot muffin tin. If you have a silicone muffin pan, use it. These cups can be a bit sticky, and silicone lets them pop right out without a struggle. If you're using metal, grease it well with butter or use paper liners.
A spatula is your best friend here. You want to fold the ingredients together gently. If you overmix, you'll lose that nice oatmeal texture and end up with something too dense. Keep it simple and fast.
Simple Steps For Success
- Preheat your oven to 350°F (175°C). Grease a muffin tin thoroughly or line with paper cups. Note: Preheating ensures the oats start absorbing moisture immediately.
- In a large bowl, combine the rolled oats, baking powder, cinnamon, and salt. Stir until evenly distributed.
- In a separate bowl, mash the bananas until smooth. Whisk in the egg, milk, maple syrup, and vanilla until the mixture is a uniform color.
- Pour the wet ingredients into the dry base. Fold gently with a spatula until just combined, then fold in the chocolate chips and chia seeds. Note: Don't overmix or the cups will become too heavy.
- Divide the batter evenly among the 12 muffin slots.
- Bake for 25–30 minutes until the tops are light mahogany and firm to the touch.
- Allow the cups to cool in the pan for 10 minutes to solidify the structure before moving to a wire rack. Note: This resting period is critical to prevent the bottoms from sticking.
Chef's Tip: Try freezing your mini chocolate chips for 10 minutes before folding them in. This prevents them from melting too quickly and keeps them as distinct pockets of chocolate rather than streaks of brown batter.
Solving Common Baking Issues
The Soggy Center
If your cups feel wet in the middle even after 30 minutes, it's usually because the bananas were too large or too watery. The moisture ratio is delicate. You can fix this by adding an extra tablespoon of oats next time to soak up that excess liquid.
The Stick Factor
There's nothing worse than half a breakfast cup sticking to the pan. This happens if the pan wasn't greased enough or if you tried to remove them while they were still piping hot. Always wait the full 10 minutes.
| Problem | Root Cause | Solution |
|---|---|---|
| Crumbly Texture | Not enough banana or egg | Increase mashed banana by 2 tbsp |
| Burnt Bottoms | Oven rack too low | Move rack to the center position |
| No Rise | Expired baking powder | Test powder in hot water to see if it bubbles |
Common Mistakes Checklist
- ✓ Mash bananas until absolutely smooth to avoid large, gummy lumps
- ✓ Use a spatula to fold, not a whisk, to maintain oat structure
- ✓ Grease the pan even if using paper liners to prevent overflow sticking
- ✓ Check doneness at 25 minutes to avoid over baking and drying them out
- ✓ Let them cool completely before stacking in a container
Creative Swaps and Twists
If your kids are bored with chocolate, you can easily pivot. I love swapping the chips for fresh blueberries or diced apple. If you use frozen berries, don't thaw them first, or you'll end up with purple streaked batter. Just toss them in frozen and bake as usual.
For those who want a nuttier flavor, replace the milk with almond milk and add a tablespoon of almond butter to the wet mix. It gives the cups a rich, velvety depth. If you're looking for something even more indulgent, check out my chocolate chip banana bread for a weekend treat.
Decision Shortcut: If you want them sweeter → Add 1 tbsp extra maple syrup or use a 3rd banana. If you want more protein → Stir in 2 tbsp of hemp seeds or Greek yogurt. If you want a "cakey" feel → Pulse half the oats in a blender to make oat flour.
| Method | Time | Texture | Best For |
|---|---|---|---|
| Standard Oven | 50 min | Chewy & Golden | Big batches / Meal prep |
| Air Fryer | 20 min | Crispy edges | 2-3 quick servings |
| Slow Cooker | 3 hrs | Custard like | Overnight prep |
Storage And Reheating Guide
These keep surprisingly well. In the fridge, store them in an airtight container for up to 5 days. They'll stay moist, though the chocolate might get a bit hard.
For long term storage, the freezer is your best bet. Once cooled, flash freeze them on a tray for an hour before moving them to a freezer bag. This prevents them from clumping together. They'll stay fresh for about 3 months.
When it's time to eat, you can pop a frozen cup in the microwave for 20-30 seconds. They come back to life and smell just like they did when they first came out of the oven. If you have an air fryer, 3 minutes at 300°F (150°C) gives them a slightly crispier exterior.
To keep things zero waste, don't throw away those overripe banana peels if you have a compost bin. If you're feeling adventurous, you can actually steep cleaned banana peels in hot water to make a nutrient rich tea for your houseplants.
Best Side Pairing Ideas
While these are filling on their own, adding a side of protein or fresh fruit makes it a complete meal. I usually serve them with a side of Greek yogurt topped with honey or a few slices of fresh orange.
If you're planning a larger brunch, these pair perfectly with some savory options. Try serving them alongside my healthy quinoa bowls for a balance of sweet and salty. It's a great way to ensure the kids get a wide range of nutrients before they head out the door.
Another great option is a simple fruit salad with a squeeze of lime juice. The acidity of the fruit cuts through the richness of the oats and banana, refreshing the palate between bites.
Debunking Oatmeal Myths
You might hear that you need flour to make "muffins" that hold their shape. That's simply not true. The starch in the oats, combined with the pectin in the bananas and the protein in the egg, creates a perfectly stable structure.
Some people think honey is a healthier alternative to maple syrup. In reality, both are very similar in nutritional profile. Maple syrup is often preferred in baking because it blends more easily into the wet ingredients without creating sticky clumps.
Recipe FAQs
Can I freeze these for later?
Yes, they freeze perfectly. Flash freeze them on a tray for an hour before moving them to a freezer bag to prevent clumping. They stay fresh for about 3 months.
Can I use quick oats instead of rolled oats?
No, stick with rolled oats. Quick oats are processed more finely and will result in a mushier, less structured cup.
Why are my oatmeal cups mushy in the middle?
They likely needed more time in the oven. Ensure they bake for 25 30 minutes until the tops are light mahogany and firm to the touch.
How to reheat frozen oatmeal cups?
Microwave a frozen cup for 20-30 seconds. This restores the texture and aroma without overcooking the oats.
Is it true I must use silicone liners to prevent sticking?
No, this is a common misconception. Thoroughly greasing a standard metal muffin tin or using paper cups works just as well.
How long do these stay fresh in the refrigerator?
Up to 5 days. Keep them in an airtight container to maintain moisture, though the chocolate chips may harden.
What should I serve with these for a balanced breakfast?
Pair them with fresh fruit or Greek yogurt. If you enjoyed the balanced nutrition here, see how we apply similar wholesome principles in our Mason Jar Salads.
Healthy Baked Oatmeal Cups

