Red Velvet Cookies: Cream Cheese Center

- Time:15 minutes active + 10 minutes chilling = Total 55 minutes
- Flavor/Texture Hook: Velvety soft centers with a slight tang
- Perfect for: Valentine's Day, dessert parties, or a sweet weekend treat
- The Best red velvet cookies recipe 2
- The Secret to Velvet Texture
- Recipe Essentials and Specs
- Gathering Your Essentials
- Necessary Baking Gear
- Step by Step Baking Process
- Avoid These Baking Mistakes
- Customizing Your Cookie Batch
- Common Baking Myths
- Storage and Freshness Tips
- Garnish and Color Guide
- Recipe FAQs
- 📝 Recipe Card
Right then, let's talk about red velvet. Most people think it's just chocolate cake with a lot of red food coloring, but that's a huge misconception. In the old days, the red color came from a natural reaction between non alkalized cocoa and acid.
Today, we use a bit of dye for that iconic look, but the soul of the dish is actually the balance between the cocoa and the cream cheese.
I remember the first time I tried to stuff these cookies. I didn't freeze the cream cheese filling, and guess what? It just melted into the dough, turning my beautiful red cookies into a weird, pale pink puddle. It was a mess. But once I figured out the "frozen dollop" trick, everything changed.
This red velvet cookies recipe 2 is all about those moments of love shared over a plate of warm treats. We're going to get a soft, pillowy cookie that feels like a bite of cake, with a hidden, creamy surprise inside.
It's a sweet, homemade experience that looks impressive but is actually quite simple once you have the rhythm down.
The Best red velvet cookies recipe 2
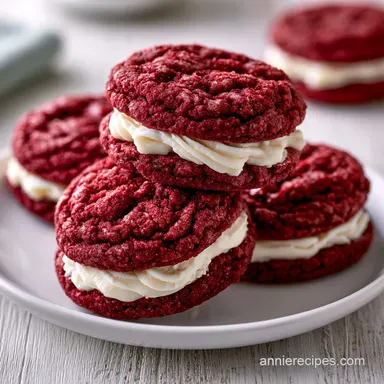
Trust me on this, the magic of these cookies is in the contrast. You've got the deep, red, slightly chocolatey dough wrapping around a bright, tangy cream cheese center. It's not just about the flavor, it's about how the textures play together.
When you bite in, you get that soft, cake like crumb and then the velvety smooth filling.
The goal here is a cookie that holds its shape but stays tender. If you overbake them, they become dry and lose that signature "velvet" feel. We want them to be just set on the edges while the middle stays a bit fudgy. It's a delicate balance, but that's what makes the final result so rewarding.
I've found that using a piping bag for the filling is the only way to stay sane. Trying to scoop tiny bits of cream cheese with a spoon is a recipe for frustration. By piping them onto a tray and popping them in the freezer, you create a consistent "core" that doesn't move during the baking process.
It's a small step that makes a massive difference.
The Secret to Velvet Texture
The Butter Bubble: When we cream the butter and sugar, we're actually forcing air into the fat. This creates tiny pockets that expand in the oven, giving the cookies a soft, cake like lift instead of a flat, dense feel.
The Frozen Core: Freezing the cream cheese dollops is a must. It ensures the filling stays in a distinct ball and doesn't leak into the dough, keeping that sharp color contrast and a creamy center.
The Cocoa Balance: We use just enough cocoa to give that earthy depth without turning the dough brown. This allows the red coloring to stay vibrant and prevents the chocolate from overpowering the cream cheese.
The Sugar Split: Using granulated sugar in the dough provides structure and a bit of a crisp edge, while the powdered sugar in the filling keeps it silky and stable.
| Method | Prep Time | Texture | Best For |
|---|---|---|---|
| Creaming Butter (This Recipe) | 15 minutes | Soft, fluffy, cake like | Classic Red Velvet feel |
| Melted Butter Method | 10 minutes | Chewy, denser, fudgy | Quick, decadent treats |
Recipe Essentials and Specs
When it comes to the ingredients, don't even bother with low-fat cream cheese. You need the full fat version so the filling doesn't break down and become watery in the oven. The quality of your cocoa powder also matters, but a standard unsweetened version works perfectly here.
For the coloring, a gel food coloring is usually better than the liquid kind because it's more concentrated. However, the measurements below are based on standard liquid coloring. If you use gel, start with half the amount and add more until you hit that deep, romantic red.
Component Analysis
| Ingredient | Science Role | Pro Secret |
|---|---|---|
| Cream Cheese | Provides acidity and fat | Use room temperature for smooth mixing |
| Baking Soda | Leavening agent | Reacts with cocoa to create lift |
| All Purpose Flour | Structural base | Sift it to avoid lumps in the velvet dough |
| Red Coloring | Visual appeal | Mix into wet ingredients for even color |
Gathering Your Essentials
Make sure your butter and cream cheese are truly softened. I usually leave them on the counter for two hours. If they're too cold, you'll get lumps in your batter, and you'll be fighting the mixer the whole time.
- 4 oz (113g) cream cheese, softened Why this? High fat for a stable, creamy center
- 2 tbsp (25g) powdered sugar Why this? Sweetens filling without adding liquid
- 1/4 tsp (1ml) vanilla extract Why this? Rounds out the tang of cheese
- 1/2 cup (113g) unsalted butter, softened Why this? Creates the airy, soft crumb
- 3/4 cup (150g) granulated sugar Why this? Gives a slight crisp to the edges
- 1 large egg (50g) Why this? Binds everything and adds moisture
- 1 tsp (5ml) vanilla extract Why this? Enhances the cocoa notes
- 1 tbsp (15ml) red food coloring Why this? Gives that signature look
- 1 3/4 cups (210g) all purpose flour Why this? Provides the necessary structure
- 2 tbsp (15g) unsweetened cocoa powder Why this? Gives the "velvet" flavor
- 1/2 tsp (3g) baking soda Why this? Helps the cookies rise
- 1/4 tsp (1.5g) salt Why this? Balances the sweetness
| Original Ingredient | Substitute | Why It Works |
|---|---|---|
| Granulated Sugar | Light Brown Sugar | Same sweetness. Note: Makes the cookie chewier and darker |
| All Purpose Flour | Almond Flour | gluten-free option. Note: Much softer, more fragile crumb |
| Unsalted Butter | Coconut Oil (Solid) | Similar fat. Note: Adds a slight coconut flavor |
Necessary Baking Gear
You don't need a professional kitchen to nail this, but a few tools make it a breeze. A stand mixer such as KitchenAid is great for creaming the butter, but a hand mixer works just fine too. The most important tool here is actually the piping bag for those cream cheese dollops.
If you don't have a piping bag, a sturdy Ziploc bag with the corner snipped off works in a pinch. Also, make sure you have parchment paper or silicone mats. These cookies have a bit of sugar and fat that can stick to a bare pan, and we want a clean release every time.
Step by step Baking Process

- Whisk the softened cream cheese, powdered sugar, and vanilla until smooth. Note: Ensure there are no lumps for a velvety center
- Transfer the mixture to a piping bag, drop small, dime sized dollops onto a tray, and freeze for 10 minutes.
- Cream together the softened butter and sugar until light and fluffy. Note: This takes about 2-3 minutes of beating
- Beat in the egg, vanilla, and red food coloring until the color is uniform.
- In a separate bowl, sift together the all purpose flour, cocoa powder, baking soda, and salt.
- Slowly incorporate the dry ingredients into the wet ingredients until just combined. Note: Stop mixing as soon as the flour disappears to avoid tough cookies
- Preheat the oven to 350°F (175°C).
- Scoop about 2 tablespoons of dough and flatten it in your palm.
- Place a frozen cream cheese dollop in the center and fold the dough around it, sealing it tightly into a ball.
- Place cookies on a lined sheet and bake for 9-11 minutes until the edges look set but the center remains slightly soft.
Avoid These Baking Mistakes
One of the biggest hurdles with this red velvet cookies recipe 2 is the spread. If your cookies are flattening out like pancakes, it's usually because your butter was too warm or you overmixed the flour. When you overmix, you develop too much gluten, which is more of a concern in homemade sourdough bread than in cookies, but it can still make these feel more like bread than cake.
Another common issue is the color. If your red looks more like a dull brown, you might be using a cocoa powder that is too alkaline (Dutch processed). Standard natural cocoa powder works best for that bright pop.
Why Your Cookies Are Spreading
If the cookies lose their dome and spread too far, the fat has likely melted before the structure could set. This happens if the dough is too warm or the oven isn't fully preheated.
| Problem | Root Cause | Solution |
|---|---|---|
| Flattened cookies | Butter too soft | Chill dough 30 mins before baking |
| Pale red color | Overbaked | Pull out at 9 mins, even if soft |
| Leaking filling | Filling not frozen | Freeze dollops for full 10 mins |
Pro Baking Checklist:
- ✓ Butter is softened but not melting
- ✓ Cream cheese dollops are frozen solid
- ✓ Dry ingredients are sifted together
- ✓ Cookies are spaced 2 inches apart
- ✓ Oven is preheated to exactly 350°F
Customizing Your Cookie Batch
If you're feeling adventurous, you can turn these into Red Velvet Crinkle Cookies by rolling the dough balls in powdered sugar before baking. The sugar cracks as the cookie rises, creating a beautiful snowy effect against the deep red.
For those who love a bit more decadence, try adding a handful of white chocolate chips to the dough. The creamy white chocolate pairs perfectly with the red velvet flavor. If you're looking for other sweet treats to pair with these, my homemade cinnamon rolls make for an incredible dessert spread.
Quick Variation Ideas
- The Cheesecake Twist: Double the filling size for a more pronounced cheesecake center.
- The Espresso Kick: Add 1 teaspoon of instant espresso powder to the flour to deepen the chocolate notes.
- The Vegan Swap: Use vegan butter and a flax egg, though the texture will be slightly denser.
| Preference | Adjustment | Result |
|---|---|---|
| Extra Chewy | Underbake by 1 min | Fudgy, soft center |
| Deeper Red | Add 1 tsp more dye | More vibrant appearance |
| Less Sweet | Reduce sugar by 2 tbsp | More cocoa forward taste |
Common Baking Myths
You might hear that you need vinegar or buttermilk to make "real" red velvet. While those ingredients help the cocoa react in traditional cakes, in a cookie, they can throw off the pH and make the dough too wet. You can get that same tang from the cream cheese filling without risking a soggy cookie.
Another myth is that you should "cream" the butter and sugar for ten minutes. Honestly, don't do that. Over creaming incorporates too much air, which can cause the cookies to puff up and then collapse, leaving you with a wrinkled surface rather than a smooth, velvety one.
Storage and Freshness Tips
These cookies are best kept in an airtight container. Because of the cream cheese center, I highly recommend storing them in the fridge for up to 5 days. If you keep them on the counter, the filling can soften too much, and they won't have that same satisfying contrast.
For long term storage, you can freeze the baked cookies for up to 3 months. Just wrap them individually in parchment paper and toss them in a freezer bag. To enjoy them, let them thaw in the fridge overnight or pop them in a 300°F oven for 5 minutes to get that "fresh from the oven" feel.
To avoid waste, if you have leftover cream cheese filling, don't throw it away! It's basically a sweetened cream cheese frosting. You can swirl it into your morning oatmeal or use it as a dip for apple slices. It's a great way to make sure every bit of your ingredients gets used.
Garnish and Color Guide
Since we're focusing on color balance, think of the cookie as your canvas. The deep red is the base, and the white filling is your primary accent. To make these truly pop for a party, you need a third color to break up the duo.
I love using a tiny sprig of fresh mint for a pop of green, or a sprinkle of gold sanding sugar on top right after they come out of the oven. The gold adds a metallic shimmer that makes the red look even richer.
If you're serving these for Valentine's Day, a drizzle of melted white chocolate over the top adds another layer of white, creating a beautiful striped effect.
Right then, that's how you nail the red velvet cookies recipe 2. Just remember to freeze that filling, don't overmix your flour, and pull them out of the oven while they still look a little underdone. They'll firm up as they cool, leaving you with a velvety, homemade treat that's pure love on a plate. Let's get baking!
Recipe FAQs
Should I store these cookies on the counter?
No, store them in the fridge. The cream cheese filling can soften too much at room temperature, which ruins the satisfying contrast of the center.
How to prevent the cream cheese filling from leaking during baking?
Freeze the filling dollops for 10 minutes before wrapping. Seal the dough tightly around the frozen center to ensure the filling stays contained while baking.
Is it true that these cookies require 20 minutes of baking to set the center?
No, this is a common misconception. Bake them for only 9-11 minutes at 350°F so the edges set while the center remains slightly soft.
How to ensure the red color is consistent throughout the dough?
Beat the red food coloring into the egg and vanilla mixture. This ensures the pigment is evenly distributed before you incorporate the dry ingredients.
Do I need to sift the flour and cocoa powder?
Yes, sifting is recommended. It removes lumps from the cocoa powder and ensures the dry ingredients integrate smoothly without overmixing.
How to reheat frozen cookies for a fresh baked taste?
Pop them in a 300°F oven for 5 minutes. This gently warms the filling and restores the cookie's texture without overcooking it.
Can I use this stuffing technique for other types of cookies?
Yes, it works for various molten centers. If you enjoyed mastering the stuffing technique here, see how the same principle works in our Nutella lava cookies.
Red Velvet Cookies Recipe 2