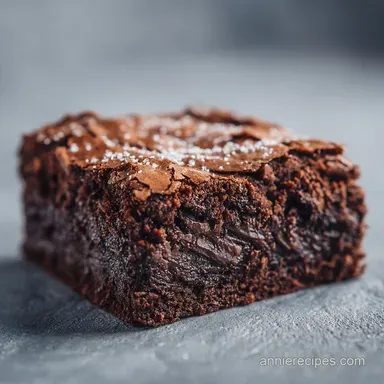
Fudgy Brownies: Rich and Dense
- Time: Active 10 minutes, Passive 25 minutes, Total 35 minutes
- Flavor/Texture Hook: Intense dark chocolate with a fudgy, melt in-the mouth crumb
- Perfect for: Potlucks, birthday celebrations, or late night cravings
- Creating the Ultimate Fudgy Brownies
- The Secret to Glossy Tops
- Essential Ingredients for Success
- Required Tools for Fudgy Results
- Mastering the Mixing Process
- Fixing Common Brownie Errors
- Adjustment Guidelines for Larger Batches
- Chocolate Baking Misconceptions
- Storing Your Homemade Treats
- Perfect Pairings for Dessert
- Recipe FAQs
- 📝 Recipe Card
Creating the Ultimate Fudgy Brownies
Imagine the kitchen filling with the heavy, sweet scent of warm butter and dark chocolate. There is something truly special about the moment you pull a tray of brownies out of the oven and see that thin, shimmering crust on top. I remember the first time I made these for a friend's housewarming party.
The room went quiet as everyone took their first bite, and I knew right then that I'd never go back to a boxed mix again.
We have all been there, standing in the baking aisle wondering if the premium cocoa powder is actually worth the extra few dollars. Trust me, in this recipe, it absolutely is. This isn't just a quick sugar fix, it is a labor of love that results in a texture so rich it almost feels like truffle.
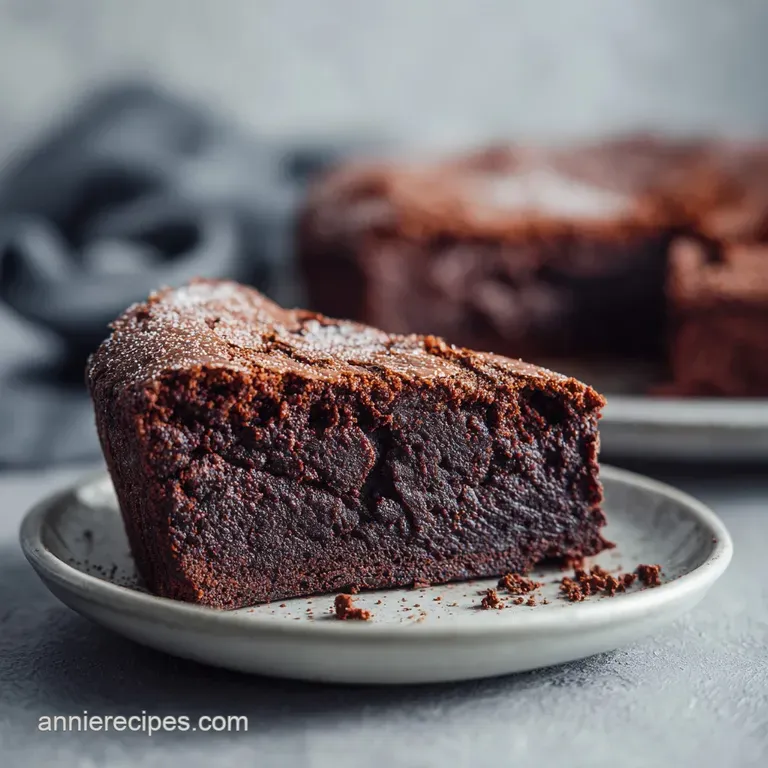
We aren't looking for a cakey, bread like square here. We want something that sits heavy on the fork and shatters slightly when you bite through the surface.
Getting that legendary crinkle top isn't about luck, it's about the way the sugar interacts with the eggs. If you have ever felt like your brownies are a bit dull or dry, you'll love the simple techniques we use here.
We're going to use a specific whisking method that transforms basic pantry staples into something that looks like it came from a professional patisserie. It is easy, it is fast, and the payoff is huge.
The Secret to Glossy Tops
The magic behind this recipe lies in a few specific physical changes we create during the mixing process. It isn't just about throwing ingredients in a bowl; it is about how they bond together.
- The Bloom Effect: Mixing cocoa powder into hot, melted butter "blooms" the chocolate. This heat releases trapped flavor compounds in the cocoa, making the final result taste much more intense than if you mixed it with dry ingredients.
- Sugar Dissolution: When we whisk the sugar into the hot butter and then the eggs, the sugar crystals begin to dissolve and form a meringue like structure. This is what creates that thin, papery crust that everyone loves.
- Low Gluten Development: By folding the flour in very gently at the very end, we prevent the formation of gluten. Less gluten means a tender, fudgy texture rather than a tough or cakey one.
- Fat Emulsification: Whisking the eggs for a full two minutes creates a stable emulsion. This traps tiny air bubbles that provide just enough lift without the need for chemical leaveners like baking powder.
| Method | Time | Texture | Best For |
|---|---|---|---|
| Fast Method (Microwave) | 35 minutes | Ultra fudgy and dense | Weeknight cravings |
| Classic Method (Bain Marie) | 50 minutes | Slightly more aerated | Special occasions |
| Cold Butter Method | 45 minutes | Chewy and firm | Meal prep snacks |
Success in the kitchen often comes down to choosing the right path for your schedule. If you're in a real rush and can't wait the full 35 minutes for this bake, this microwave mug cake is a lifesaver for an instant chocolate hit. However, if you have the time to preheat the oven, sticking with the stovetop or microwave butter melting method will give you the most consistent fudginess.
| Component | Science Role | Pro Secret |
|---|---|---|
| Unsalted Butter | Provides fat for tenderness | Melt until hot to help dissolve sugar |
| Dutch Processed Cocoa | Deep flavor and dark color | Sift to avoid stubborn clumps |
| Large Eggs | Structure and emulsification | Use room temperature for better volume |
| Granulated Sugar | Sweetness and crinkle top | Whisk vigorously to create the crust |
Essential Ingredients for Success
Choosing the right components is the first step toward brownie perfection. Every gram counts when you're aiming for that specific, velvety texture that defines a world class brownie.
- 225g Unsalted Butter: Melted and hot. Why this? Hot butter is essential for blooming the cocoa and dissolving the granulated sugar properly.
- Substitute: Salted butter (just omit the extra sea salt).
- 95g Dutch Processed Cocoa Powder: Sifted. Why this? It has a more neutral pH and a deeper, smoother chocolate flavor than natural cocoa.
- Substitute: high-quality natural cocoa powder (result will be slightly more acidic).
- 5g Espresso Powder: Finely ground. Why this? It doesn't make the brownies taste like coffee; it simply intensifies the chocolate notes.
- Substitute: Instant coffee granules crushed into a fine powder.
- 400g Granulated Sugar: White sugar. Why this? Essential for creating the structural meringue that forms the shiny, crackly top.
- Substitute: 300g white sugar and 100g light brown sugar for extra chewiness.
- 4 Large Eggs: Room temperature. Why this? They incorporate much more easily into the fat, creating a smoother, glossier batter.
- Substitute: Commercial egg replacer (note: this may reduce the "crinkle" on top).
- 15ml Vanilla Extract: Pure extract. Why this? Adds a layer of floral sweetness that balances the bitterness of the cocoa.
- Substitute: Vanilla bean paste for those beautiful black flecks.
- 6g Fine Sea Salt: high quality. Why this? Salt is a flavor enhancer that makes the chocolate taste "more like chocolate."
- Substitute: Table salt (use only 4g as it is more dense).
- 125g All Purpose Flour: Plain flour. Why this? Provides just enough structure to hold the brownies together without making them cakey.
- Substitute: 1:1 gluten-free flour blend with xanthan gum.
- 170g Semi Sweet Chocolate Chips: Standard size. Why this? Adds pockets of melted chocolate for a varied texture in every bite.
- Substitute: Chopped dark chocolate bars for better melting pools.
Required Tools for Fudgy Results
You don't need a kitchen full of gadgets to make these, but a few specific items will make your life much easier. I always reach for my glass bowls for this recipe because they hold heat well, which helps the sugar dissolve into the butter.
First, you'll need a reliable 8x8 inch square baking pan. I prefer metal over glass for brownies because metal conducts heat more evenly, preventing the edges from overcooking before the center is set. If you only have a 9x9 inch pan, just keep a close eye on the timer, as they will bake faster.
A sturdy balloon whisk is your best friend here. We aren't using an electric mixer because it's too easy to over incorporate air, which leads to a cakey brownie. A hand whisk gives you total control over the emulsion. Finally,, make sure you have parchment paper.
Greasing the pan is fine, but parchment allows you to lift the entire block of brownies out of the pan for clean, professional looking slices.
Mastering the Mixing Process

- Preheat your oven to 350°F (175°C) and line an 8x8 inch square baking pan with parchment paper, leaving an overhang on the sides. Note: This overhang acts as a handle for easy removal later.
- In a large microwave safe glass bowl, combine the hot melted butter, espresso powder, and cocoa powder.
- Whisk the butter and cocoa vigorously until the mixture is smooth and the aroma is deep and earthy.
- Add the granulated sugar and sea salt to the warm butter mixture.
- Whisk until combined; until the texture looks gritty and the sugar is partially coated in fat.
- Add the room temperature eggs one at a time, followed by the vanilla extract.
- Whisk by hand for a full 2 minutes until the batter is glossy and falls off the whisk in thick ribbons.
- Gently fold in the all purpose flour and semi sweet chocolate chips using a silicone spatula.
- Stop mixing until no streaks of white flour remain visible in the dark batter.
- Pour the batter into the prepared pan and bake for 25 minutes. until the edges are firm but the center still jiggles slightly.
Fixing Common Brownie Errors
Baking is a science, and even a small mistake can change the outcome. If your brownies didn't turn out quite right, it is usually a simple fix related to temperature or mixing time.
Dry and Crumbly Texture
If your brownies are falling apart and feel more like dry cake than fudge, they were likely in the oven too long. The "toothpick test" is actually misleading for fudgy brownies; if the toothpick comes out completely clean, they are overdone. You want a few moist crumbs clinging to it.
Dull and Matte Top
The lack of a shiny, crackly crust is almost always due to the eggs and sugar not being whisked long enough. That 2 minute whisking step in the instructions is vital. It creates the meringue layer that rises to the top during baking.
If you skip it, your brownies will still taste good, but they will look more like chocolate bread.
| Problem | Root Cause | Solution |
|---|---|---|
| Greasy Surface | Butter was too hot or separated | Whisk longer to re emulsify the fat |
| Cakey Texture | Too much air or too much flour | Use a kitchen scale for flour; don't over whisk |
| Sunken Center | Underbaked or oven door opened too early | Bake until edges pull away from the pan |
Common Mistakes Checklist
- ✓ Pat your eggs to room temperature in warm water if you forgot to take them out of the fridge.
- ✓ Use a kitchen scale for the flour; a measuring cup often packs too much in, leading to dry brownies.
- ✓ Avoid over mixing once the flour is added to keep the texture tender.
- ✓ Ensure your oven is fully preheated for at least 15 minutes before the pan goes in.
- ✓ Let the brownies cool completely in the pan for at least 2 hours before slicing.
Adjustment Guidelines for Larger Batches
Scaling a brownie recipe is fairly straightforward, but you need to be careful with the pan size to maintain that perfect thickness. If you want to double the recipe, use a 9x13 inch pan. The surface area is larger, so the bake time usually stays around 25 to 30 minutes, but check them early.
When scaling down to a half batch, a standard loaf pan works brilliantly. Because the batter is deeper in a loaf pan, you might need to add 5 minutes to the bake time. For the eggs, if you need "half an egg," simply crack it into a small bowl, whisk it well, and then use two tablespoons of the mixture.
For those times when you want a completely different shape and texture but still want that chocolate fix, these no cream cheese Oreo balls are a fantastic alternative that scales easily for large parties. They offer a similar richness but with a completely different "pop" of flavor.
| Original Ingredient | Substitute | Why It Works |
|---|---|---|
| Granulated Sugar | Light Brown Sugar | Adds moisture and a hint of molasses flavor. Note: Result will be slightly chewier. |
| AP Flour | Almond Flour | Provides a nutty base. Note: Result will be much softer and more fragile. |
| Butter | Coconut Oil | Similar fat profile. Note: Adds a subtle tropical scent and makes them dairy-free. |
Chocolate Baking Misconceptions
One common myth is that you must use expensive melted chocolate bars to get a "real" brownie. In reality, high-quality cocoa powder often provides a more intense chocolate flavor because it doesn't contain the extra cocoa butter and sugar found in bars.
Cocoa based brownies are often more reliable for that specific fudgy texture.
Another misconception is that brownies should be eaten warm from the oven. While it's tempting, the structure of a fudgy brownie actually sets as it cools. If you cut into them while they are hot, they will be messy and may seem undercooked.
Waiting two hours allows the fats to solidify and the flavors to meld together properly.
Finally,, many people think you need baking powder for "lift." In a fudgy brownie, we actually want to avoid lift. Baking powder creates air pockets that lead to a cakey crumb. By relying only on the eggs for structure, we ensure the brownies remain dense and decadent.
Storing Your Homemade Treats
To keep these brownies at their peak, store them in an airtight container at room temperature for up to 4 days. If you find they are starting to dry out, a quick 10 second zap in the microwave will bring back that "just baked" softness. For longer storage, they actually freeze beautifully.
Wrap individual squares in plastic wrap and then foil; they will stay fresh for up to 3 months. You can even eat them straight from the freezer for a firm, fudge like snack!
Don't let any scraps go to waste. If you have edges that are a bit too crispy or crumbs left in the pan, save them! I love to fold brownie pieces into vanilla ice cream or use them as a base for a chocolate trifle.
You can even pulse dried out brownie scraps in a food processor to create a "chocolate soil" topping for puddings or cakes.
Perfect Pairings for Dessert
While these brownies are a powerhouse on their own, pairing them correctly can turn a simple snack into a gourmet experience. A cold glass of whole milk is the classic choice, but if you're serving these for guests, try a dollop of crème fraîche.
The slight tang of the cream cuts through the intense sweetness of the chocolate perfectly.
For a more sophisticated pairing, a sprinkle of flaky sea salt on top right after baking adds a beautiful crunch and heightens the espresso notes. If you're looking for a fruit element, fresh raspberries or a quick strawberry coulis provide a bright acidity that balances the heavy cocoa.
Whatever you choose, make sure the brownies are the star of the show by keeping the sides simple and fresh.
Recipe FAQs
What is the secret to super fudgy brownies?
Whisk the eggs, sugar, and vanilla for a full 2 minutes. This process creates a glossy, pale, ribbon like consistency that is essential for achieving that signature dense and fudgy texture.
What makes the best fudgy brownies?
Blooming the cocoa powder in hot, melted butter. Whisking these together until smooth intensifies the chocolate flavor and ensures a rich, decadent base before adding other ingredients.
Can a diabetic eat brownies?
Consult with a healthcare provider regarding dietary restrictions. Because this recipe contains 400g of granulated sugar, it is high in carbohydrates and requires careful management for those monitoring blood glucose levels.
What is the secret to the best brownies?
Cool them completely in the pan for 2 hours before slicing. Cutting too early will cause the soft, fudgy center to smear, whereas patience ensures clean, perfect edges and the ideal set texture.
Is it true I should use a mixer to get the fluffiest brownies?
No, this is a common misconception. You should whisk by hand to properly incorporate the eggs and sugar, as using an electric mixer can incorporate too much air and change the intended fudgy density.
How to avoid dry brownies?
Use a kitchen scale to measure your flour. Measuring cups often pack the flour down, leading to an excess amount that dries out the batter; exactly 125g ensures the perfect moist crumb.
How to store brownies for the best texture?
Keep them in an airtight container at room temperature for up to 4 days. If they lose their softness, a 10-second blast in the microwave will restore that fresh baked, fudgy quality instantly.
Ultimate Fudgy Brownies