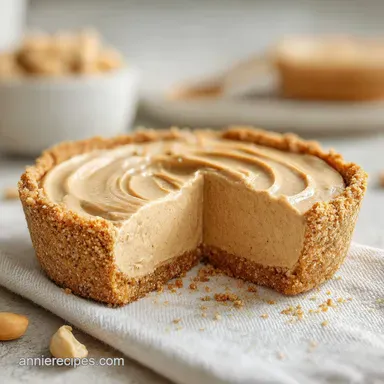
Peanut Butter Pie: Guilt-Free and Easy
- Time:20 minutes active + 4 hours chilling = Total 4 hours 20 mins
- Flavor/Texture Hook: Shattering graham crust with a silky, gold toned filling
- Perfect for: Potlucks, holiday parties, or a surprise treat for peanut butter lovers
Peanut Butter Pie
The first thing you'll notice is the scent, a toasted, sugary warmth from the graham crackers that fills the kitchen. I remember the first time I brought this to a family reunion, thinking it was just another dessert.
My niece, who usually hates anything "too fancy," took one bite and asked if I'd somehow turned a giant peanut butter cup into a cake. That's the magic of this dish, it feels nostalgic and homemade, like something your grandmother would make, but it has a professional, smooth finish.
I've spent a lot of time making sure the balance is just right. For a long time, I struggled with fillings that were either too stiff, like a block of cold cheese, or too runny, where the slice just slid off the plate. The trick is in the temperature of your ingredients and the way you fold in the air.
When you get it right, you have a slice that holds its shape but melts the second it hits your tongue.
This recipe is all about love and patience. It's not a rushed dessert, because the chill time is where the flavors actually marry together. By the time you pull it out of the fridge and add that final drizzle of melted peanut butter, you've created something that feels like a celebration.
Trust me, your friends will be asking for this recipe before they've even finished their first slice.
Typical Recipe Failures
Many versions of this dessert rely on way too much powdered sugar, which can make the filling feel cloying and artificial. I prefer using maple syrup because it adds a depth of flavor that complements the saltiness of the peanut butter without masking it.
Also, a lot of people skip the step of freezing the crust, which leads to that heartbreaking moment where the base crumbles the second you try to slice it.
Another common mistake is over beating the cream. If you whip the heavy cream into a hard peak and then beat it into the peanut butter mixture, you'll end up with a grainy texture. The goal is a velvety consistency, not a fluffy mousse.
It's all about the gentle fold, treating the mixture with care to keep those tiny air bubbles intact.
Finally, using cold cream cheese is a recipe for lumps. You want it truly softened, not just "slightly" room temperature. If the cream cheese isn't pliable, it won't emulsify with the peanut butter, and you'll be left with little white streaks of cheese throughout your pie.
It's a small detail, but it's the difference between a home style treat and a professional looking dessert.
The Secret to the Set
Fat Stability: The combination of cream cheese and peanut butter creates a thick, stable emulsion that holds its shape. According to the guides at Serious Eats, maintaining the right fat to liquid ratio is what prevents no bake fillings from weeping.
Aeration Balance: Folding in whipped cream introduces air, which lightens the dense fats. This ensures the filling is silky rather than heavy.
Crust Compression: Pressing the crumbs firmly and chilling them creates a solid wall. This prevents the filling from seeping into the base and making it soggy.
| Method | Time | Texture | Best For |
|---|---|---|---|
| No Bake (This Recipe) | 20 min active | Velvety & Creamy | Summer parties, quick prep |
| Baked Custard | 60 min active | Dense & Rich | Winter holidays, traditional feel |
| Frozen Mousse | 30 min active | Airy & Icy | Extreme heat, refreshing treat |
Component Analysis
| Ingredient | Science Role | Pro Secret |
|---|---|---|
| Cream Cheese | Structural Base | Must be fully softened to avoid lumps |
| Peanut Butter | Flavor Emulsion | Use a brand with no added sugar for better salt balance |
| Heavy Cream | Volume & Lift | Keep the bowl chilled for maximum peak height |
| Maple Syrup | Natural Sweetener | Adds a subtle woody note that cuts through the fat |
Gathering Your Essentials
For the base, we're using graham cracker crumbs. You can buy them pre crushed, but crushing them yourself allows you to control the texture. I like a few larger chunks for a bit of contrast. You'll also need unsalted butter, which acts as the glue, and a pinch of sugar and salt to make the crust taste like a real cookie. For more on the chemistry of crusts, King Arthur Baking has great tips on achieving the right crumb to fat ratio.
The filling is where the love happens. You'll need full fat cream cheese, as the low-fat versions won't set properly. Creamy peanut butter is the star here, and I recommend a standard commercial brand for consistency. Maple syrup provides the sweetness, and a splash of vanilla extract rounds everything out.
Finally,, the topping. Heavy whipping cream is essential for those gorgeous white peaks. I also save a small amount of peanut butter to melt down for the final drizzle. This adds a visual pop and an extra hit of concentrated flavor that wakes up the palate.
| Original Ingredient | Substitute | Why It Works |
|---|---|---|
| Graham Cracker Crumbs | Digestive Biscuits | Similar texture. Note: Slightly more honey flavor |
| Maple Syrup | Honey | Similar viscosity. Note: Stronger, distinct floral taste |
| Creamy Peanut Butter | Almond Butter | Same fat content. Note: More subtle, nutty flavor |
| Heavy Cream | Coconut Cream (Chilled) | High fat content. Note: Adds a tropical note, vegan friendly |
Necessary Gear
You don't need a professional kitchen to make this happen, but a few tools make it easier. A 9 inch pie dish is the standard, and I recommend one with a removable bottom if you have it, though a traditional ceramic dish works just fine. A medium mixing bowl is needed for the crust, and a larger one for the filling.
For the filling, a hand mixer or a stand mixer (like a KitchenAid) is a lifesaver. Trying to beat cream cheese by hand is a workout nobody wants. You'll also need a separate chilled bowl for whipping the cream.
A rubber spatula is non negotiable for the folding process, as it allows you to gently incorporate the cream without deflating it.
Finally, a small microwave safe bowl for melting the peanut butter drizzle and a measuring cup to press the crust into the pan. Using the flat bottom of a measuring cup ensures the crust is evenly packed and there are no air gaps along the sides.
Detailed Steps

- Stir together the graham cracker crumbs, melted butter, and sugar in a medium bowl until the mixture looks like wet sand. Note: Don't over mix or the butter will pool.
- Firmly press the mixture into the bottom and up the sides of a 9 inch pie dish using the bottom of a measuring cup until it is tightly packed and smooth.
- Place the crust in the freezer for 10 minutes to lock the butter and structure in place.
- Beat the softened cream cheese and peanut butter together on medium high until the mixture is pale gold and completely smooth.
- Mix in the maple syrup and vanilla extract until fully incorporated and glossy.
- Whip the heavy cream in a chilled bowl until stiff peaks form, then gently fold the whipped cream into the peanut butter mixture using a spatula. Note: Fold in 3 batches to keep the air.
- Pour the filling into the prepared crust, smooth the top with a spoon, and refrigerate for at least 4 hours until the center feels firm to a light touch.
- Whip the remaining heavy cream and top the pie with it, then drizzle with melted peanut butter just before serving for a fresh look.
Common Problem Fixes
When things go wrong with a Peanut Butter Pie, it's usually due to temperature or timing. If your filling feels too soft, it's often because the cream cheese wasn't cold enough during the setting phase or the heavy cream was over beaten and collapsed. If the crust is crumbling, it usually means there wasn't enough butter or it wasn't pressed firmly enough into the pan.
Runny Filling
This usually happens if the whipped cream is folded in too aggressively or if the pie hasn't chilled for the full 4 hours. The structure depends on the fats cooling down.
Soggy Base
This occurs when the filling is added to a warm crust or if the crust wasn't packed tightly. The fats in the filling can seep into the crumbs.
Grainy Mix
If you see tiny lumps, the cream cheese was likely too cold when you started beating it. This prevents it from blending smoothly with the peanut butter.
| Problem | Root Cause | Solution |
|---|---|---|
| Filling is too soft | Not chilled long enough | Refrigerate for another 2 hours |
| Crust falls apart | Not enough pressure | Use a flat tool to pack firmly |
| Lumpy texture | Cold cream cheese | Beat the mixture longer on high speed |
Quick Fix Checklist
- ✓ Ensure cream cheese is room temperature before starting.
- ✓ Chill the mixing bowl for the cream in the freezer for 5 mins.
- ✓ Use a rubber spatula for folding, never a whisk.
- ✓ Press the crust edges firmly to prevent "leaking" sides.
- ✓ Wait the full 4 hours before slicing.
Customizing Your Pie
One of the best parts about this recipe is how easy it is to tweak. If you want a more decadent experience, you can turn this into a chocolate peanut butter pie by adding a layer of ganache on top of the filling before adding the cream.
For those who love a little crunch, adding chopped roasted peanuts to the crust or sprinkling them on top adds a great texture contrast.
If you're in the mood for something even more chocolatey, you might pair a slice of this with some Fudgy Brownies on the side for a total dessert platter. You could also swap the graham crackers for crushed Oreos to give it a "peanut butter cup" vibe.
For a lighter version, you can reduce the maple syrup and add a touch of honey or a splash of almond extract. If you want to go vegan, you can use a cashew based cream cheese and coconut cream, though you'll need to increase the chilling time by about 2 hours to ensure it sets properly.
Chocolate Twist
Melt 4 oz of dark chocolate and 2 tbsp of butter. Pour it over the chilled peanut butter layer before adding the whipped cream.
Vegan Options
Substitute cream cheese with vegan cream cheese and use chilled coconut cream instead of heavy cream.
Crunchy Texture
Stir 1/2 cup of crushed salted peanuts into the graham cracker crust for an extra salty kick.
Preservation Secrets
Since this pie is full of dairy and fats, it needs to stay cold. I recommend keeping it in the refrigerator for up to 5 days. To keep the whipped cream from absorbing fridge smells, cover the pie loosely with plastic wrap or store it in a cake dome.
If you want to save it for later, you can actually freeze this dessert. I find that it holds up beautifully in the freezer for up to 2 months. When you're ready to eat it, let it thaw in the fridge overnight.
This makes the texture almost like a frozen peanut butter cheesecake, which is honestly a treat in its own right.
While you're planning your make-ahead desserts, you might also like my Chocolate Chip Banana Bread, which stays moist for days. To avoid waste, if you have leftover graham cracker crumbs, don't toss them. Stir them into your morning yogurt or use them as a topping for a homemade banana pudding.
Presentation Tips
To make this pie look like it came from a high end bakery, focus on color balance. You have three main tones: the golden brown crust, the creamy white topping, and the deep amber peanut butter drizzle. The key is to create contrast so the colors don't blend together.
First, use a piping bag or a sturdy spoon to create "dollops" of whipped cream rather than spreading it flat. This creates height and shadows, making the pie look more dynamic. Then, add your color accents.
I love adding a sprinkle of crushed peanuts for a rustic, golden texture and a few fresh raspberries or a mint leaf for a pop of red or green.
The final touch is the drizzle. Melt the peanut butter until it's fluid, then use a spoon to create thin, overlapping lines across the white cream. This deep brown contrast against the white is what makes the dish look visually satisfying.
Gold Accents
Add crushed honey roasted peanuts around the edge of the crust.
White Contrast
Pipe the whipped cream in high peaks to create a snowy landscape.
Deep Amber Finish
Drizzle the melted peanut butter in a zig zag pattern across the top.
Recipe FAQs
Is this the same as Dolly Parton's peanut butter pie?
No, this is a specific no-bake variation. While many celebrity recipes exist, this version utilizes maple syrup and a whipped cream fold to create a lighter, airier mousse.
Is peanut butter pie a recognized dessert?
Yes, it is a classic no-bake staple. It typically features a pressed crumb crust and a rich, creamy peanut butter filling that balances salty and sweet notes.
Why is my peanut butter pie filling too runny?
Whip the heavy cream to stiff peaks first. If the cream is under whipped or the cream cheese wasn't beaten until completely smooth, the filling will lack the structure needed to hold a slice.
Can I substitute honey for the maple syrup?
Yes, honey works as a direct substitute. Since you are balancing natural sweeteners, the same flavor logic is used in our honey toasted granola.
How long can I store this pie in the refrigerator?
Keep it refrigerated for up to 24 hours. Beyond this window, the graham cracker crust may absorb moisture and the whipped topping can begin to deflate.
How to achieve a pale gold, smooth filling?
Beat softened cream cheese and peanut butter on medium high. Continue mixing until the texture is completely smooth and the color lightens before adding the liquid ingredients.
Is it true that this pie requires baking to set?
No, this is a common misconception. This is a no-bake dessert that relies on the stability of the fats and a minimum 4-hour chill time to firm up.
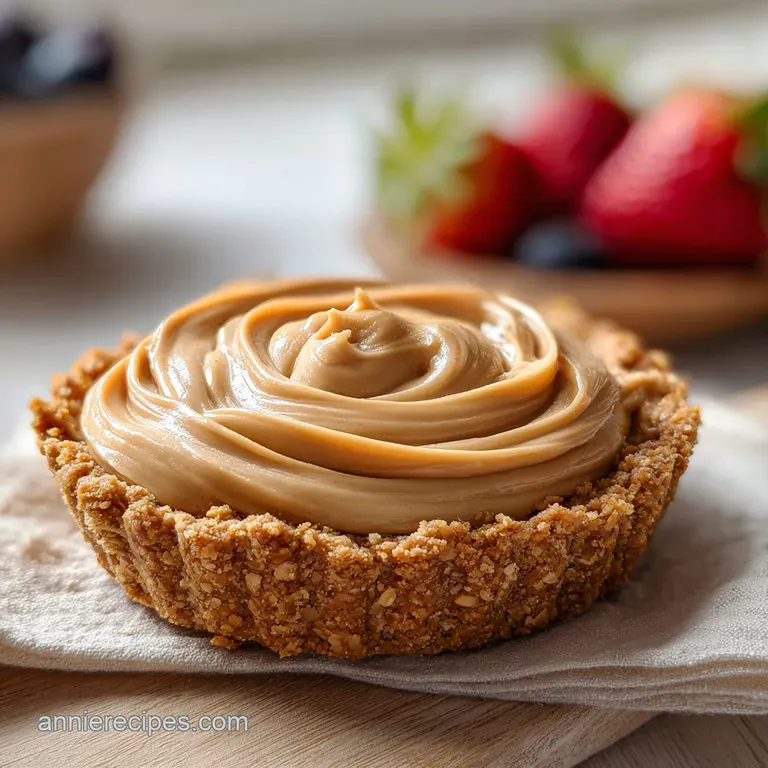
Creamy Peanut Butter Pie